SUBJECT: Side Gapping Spark Plugs
COST: Time only
TIME: 30 minutes
WHAT'S NEEDED: Your favorite spark plugs (Motorcraft or Autolite preferred), feeler gauge,
DETAILS: One of the problems of buying the "premium" type spark plugs, is not only the initial cash outlay, but the hesitation to replace them at sooner than "normal" intervals. Hesitation to replace expensive plugs when attempting to diagnose an unknown problem is common and many times can waste a lot of time in the diagnostics procedure, especially when it turns out the plugs were the culprit.
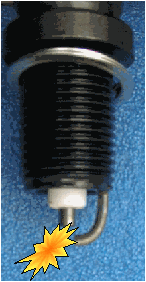
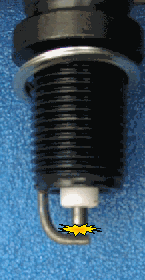
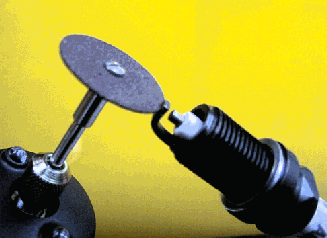
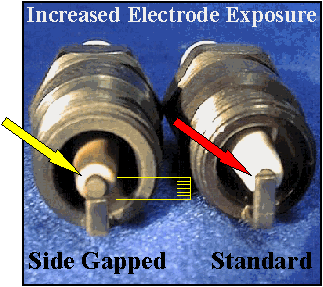
SOLUTION: First, obtain a high quality over the counter version that carries an economical price. Motorcraft and Autolite come to mind for their performance and safety features of inherently melting before the piston does. Then carefully shorten the electrode arm by taking a die grinder with a small cut-off wheel and remove a small portion from the end. *Do not* nick any part of the center electrode or porcelain! As seen in the photos below, nearly the entire center electrode can be seen from the bottom of the plug as compared to the standard version being completely shrouded from view. This modification will expose more of the generated spark to the combustion chamber, thereby more completely igniting the air/fuel charge instead of the spark being forced to propagate in a sideways direction and not directly into the majority of the combustion mix. This procedure of exposing the electrode is called "Side Gapping", and has been a well kept secret for many years in the racing circles. While some may debate the amount of Horsepower, Torque & Fuel economy increases, there is no disputing that side gapped plugs significantly improve spark propagation as well as reduce plug fouling and loading up, with no sacrifice to your wallet.
The sharper edges also encourages the spark to ignite quicker and stronger, much like striking an arc with a welder on an edge rather than a flat surface. However, there is one minor drawback, and that would be the center electrode will wear one side sooner due to the spark now being directed to one specific area on the plug edge, rather than a random path all around the electrode point. Even though the plugs may wear slightly quicker, since your home-modified plugs can cost up to four times less than that of "premium" versions, they can be more readily changed, leaving you with fresh new plugs during your engine's operation more of the time than with the costly premium versions.
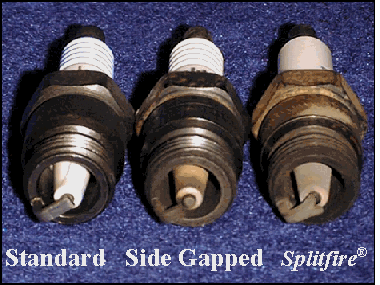
As the photos show, the side gapped plug exposes more of the spark path to the open combustion chamber than the Standard version, as well as even the Splitfire� or Bosch+4� types. And this can be done to any of your favorite brands of plugs you already like, to make them better!
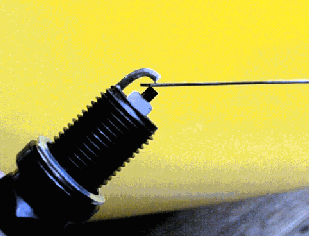
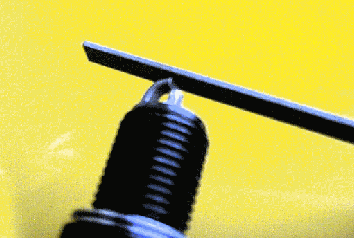
To gap the new plug, slide the feeler gauge in at a 45 degree angle to read the tightest clearance between the center electrode and the arm. Slightly tighter than OEM recommended gaps can be taken advantage of, measuring the actual space between the closest surfaces of the two electrodes. Reduce gaps by approximately .010". Closer clearances will yield the same if not more of the spark front, and at the same time resist the flame from being "blown out" when using Nitrous Oxide injection or supercharging. The closer "sharp edged" surfaces will more easily propagate the initial spark while the main mass of surface area being farther away, will increase the spark travel (volume). Re-gap periodically, as the accelerated wear on the electrode edges will increase the gap sooner.
NOTE: Side Gapping spark plugs has been the serious racer's secret since the early 60's. Only recently have major manufactures started producing this style of plug for mass production, but with unreproducible sophisticated designs, since if their expensive plugs looked like these, they would lose all their business to home mechanics copying that simple to do at home design. Experiment with different configurations and� Have fun!
PHOTO: ��...The left photo illustrates the shrouded standard type plug (red arrow) "squeezing" the spark sideways rather than downwards directly into the homogenized combustion mix in the cylinder such as the newly modified Side Gapped version does (yellow arrow). The Yellow graduation shows how much of the arm that was cut off. The right photo compares three types of plugs. Note the center electrode exposure the combustion chamber sees.


Cut the electrode arm off even with the edge of the center electrode. *do not* touch the center electrode or porcelain!

Carefully file the edges of the electrode arm to remove any remaining burrs, but keep the edges clean and sharp.

With a feeler gauge, set the gap at the narrowest point between the center electrode and the electrode arm. Reduce the gap by .010" than norm specifications.


The increased electrode exposure guides the angle of the flame front down towards the center of the combustion chamber promoting a faster, more complete and even burn thus increase power, performance and fuel mileage as well as reducing plug fouling.

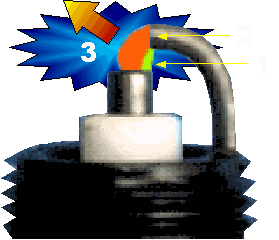
HOW SIDE GAPPING WORKS: The closer gap (1-Yellow) allows for easier ignition while the angled surfaces (2-orange) allow the ignited spark to grow in size to exceed that of normally shaped plugs. As the spark column flows along the electrode surface it grows outwards in size towards the combustion chamber and down towards the piston (3) creating a larger spark presence but with an easier starting spark for situations where more spark is needed, such as high compression cylinders, high rpm's and increased fuel conditions as well as preventing "spark blow-out" in nitrous and super/turbo charging applications.
Thanks
Courtesy: racerf1 (Pakwheels)
Courtesy: racerf1 (Pakwheels)

No comments:
Post a Comment